

 2369
2369
This product supports remote monitoring in a networked environment or supports AP hotspot connection devices in an environment without a network. Please connect the devices according to your actual needs via this manual.
Please download and install the mobile app before using this device.
- Android (Android)
- Search and install "MyCam by Microshare" in the Android mobile phone software market.
- Use the mobile browser to scan the QR code on the manual to install the app. To ensure the app functions properly, please do not disable the notification function and all prompts should be enabled.
- Apple (IOS)
- Search for "MyCam by Microshare" in the Apple App Store, download and install it.
- Use the QR code on the cover of the mobile phone to scan the manual to install the app. When installing the app, please enable the notification function.

WIFI Network Connection
- Please check the network environment. This device does not support connecting to a 5G router. Before configuring the device WIFI, please make sure that your mobile phone connection is a 2.4G WIFI router.
- Power on the device and turn the ON/OFF button on the back of the device to ON. The device starts the self-test program.
- If you need to record, please insert the TF card into the TF card slot on the back of the device.
After the new device is used for the first time or replaced with a different network environment, you must follow the following steps. After the WIFI is successfully configured, the device can be used normally.
Step 1. Launch the mobile app "Microshare" application and click Register Account (Figure 1)
Step 2: After successful registration, return to the app homepage, enter the account password, and log in to the account (Figure 2)
Step 3. Click "+" in the upper right corner of the app to add the device (Figure 3)
Step 4. Click "Add a device with one button" (Fig. 4)
Step 5. Go to WiFi setting options (Fig. 5)
Step 6. Choose BCM XXXXXXXX (Fig. 6)
Step 7. Click Microshare in the upper left corner of the software to return to the video menu (Fig. 7)
Step 8. Select the middle configuration outer network option (Fig. 8)
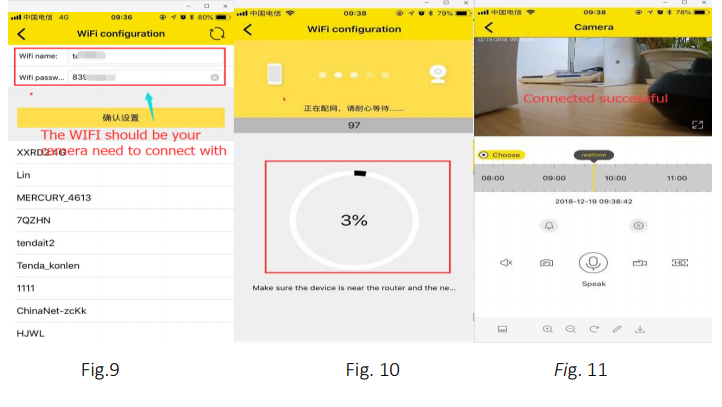
Step 9. Select the network you want to configure (Note: The WIFI password cannot have a special symbol) (Fig. 9)
Step 10: Into the configuration of the network (Figure 10)
If the network configuration fails, press and hold the RESET button on the back of the device for five seconds. After restoring the factory settings, repeat steps 3-10.

Device Alarm and Recording Function Settings
- The device configuration is successful. After entering the main screen, you can click the Settings button to set the function of the device (Figure 11)
- Enter the settings list (Figure 12)
- Select the SD card setting to enable the Sound Recording and Video Overlay functions (Fig. 13) Recording coverage means that after the SD card is full, the new recording will overwrite the oldest recording, thus achieving the function of loop recording
- The first use must "format SD card" (Figure 14) after formatting is complete, select "Save" then exit.
- Select Alarm Recording Settings in the setting interface (Figure 12)
- Alarm Video Setting: Motion detection alarm recording, that is, the moving object is detected within the monitoring range, and the recording function is enabled after the triggering. The motion detection alarm has high, medium and low three-speed sensitivity adjustable (Fig. 15)


